Introduction
If you’ve ever wondered, Is paint correction worth it?—you’re not alone. Car enthusiasts, daily drivers, and professionals alike ask this question when they notice their vehicle’s paint looking dull or marred by swirl marks. Paint correction is a process that removes surface imperfections to reveal a smoother, more vibrant finish. It’s not just about vanity; it’s also about preserving and potentially enhancing your car’s resale value. In this article, we’ll examine the real results you can expect, the costs and time involved, and why so many drivers are opting for paint correction over traditional waxing or polishing alone.
But first, let’s address the basics—what exactly is paint correction? How does it differ from a quick buff-and-shine? We’ll walk through these questions, exploring every nook and cranny of the process. You’ll learn about the levels of paint correction, from one-step polishes to multi-stage treatments. You’ll get a sneak peek into the science behind polishing compounds and discover how something as simple as a swirl mark can affect the life span of your car’s paint.
By the end of this guide, you’ll be able to decide for yourself if paint correction is the right move for your vehicle. We’ll also outline the tools you’ll need if you decide to take the DIY route and explain why professional detailers often achieve different outcomes. Along the way, you’ll find tips on maintaining a newly corrected finish, busting myths around the process, and looking toward the future of paint care technology. So let’s dive in with optimism—your car’s paint is about to get a brand-new lease on life.
The Basics of Paint Correction
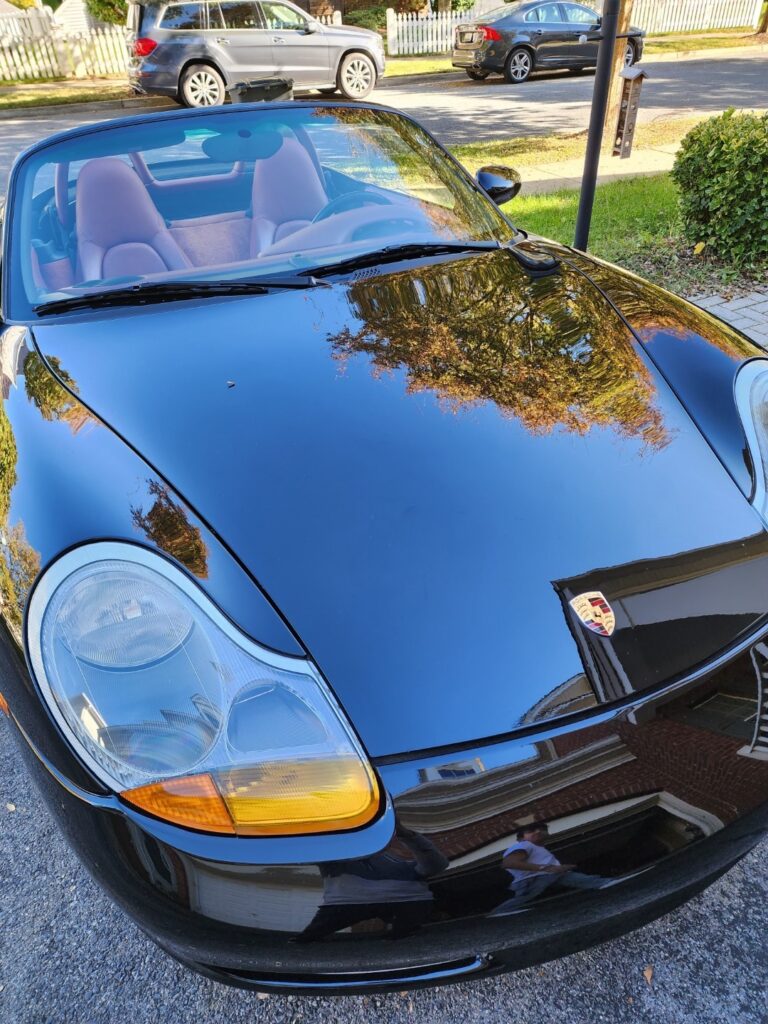
Paint correction, in the simplest terms, is the process of removing imperfections in the vehicle’s clear coat. These imperfections include swirl marks, fine scratches, water spots, and oxidation. If left unattended, these flaws can lead to more serious paint damage and ultimately reduce the aesthetic appeal and potential resale value of your car.
Here’s a quick snapshot of what you need to know about paint correction:
- Surface Imperfections: These can be caused by improper washing techniques, environmental contaminants, or even automatic car washes that use abrasive brushes.
- Machine Polish: A machine polisher with the right compound and pad combination physically levels out minor irregularities in the clear coat.
- Multiple Stages: Paint correction can be a one-step or multi-step process, depending on how severe the imperfections are.
- Expertise: While DIY kits are available, the depth of knowledge and skill offered by a professional detailer often leads to more refined and longer-lasting results.
The idea behind paint correction is to bring the vehicle’s paint as close as possible to its factory condition—or in some cases, even better. Because modern cars use a two-stage paint system (base coat followed by clear coat), removing a small layer of clear coat can effectively erase superficial scratches. However, it’s not something to be taken lightly. Removing clear coat material reduces overall paint thickness, so precision and careful technique are key.
While the concept of “correction” might sound severe, it’s done with micro-abrasive compounds specifically designed to minimize the risk of permanent damage. When executed properly, paint correction breathes new life into a tired paint job, transforming dull surfaces into glossy reflections that can rival showroom condition.
Causes of Paint Imperfections
Even if you’re meticulous about washing your car, paint imperfections are almost inevitable. The reason? Daily wear-and-tear is relentless, and environmental factors can take a toll on your car’s exterior. Understanding these causes helps you see why paint correction might be a worthy investment.
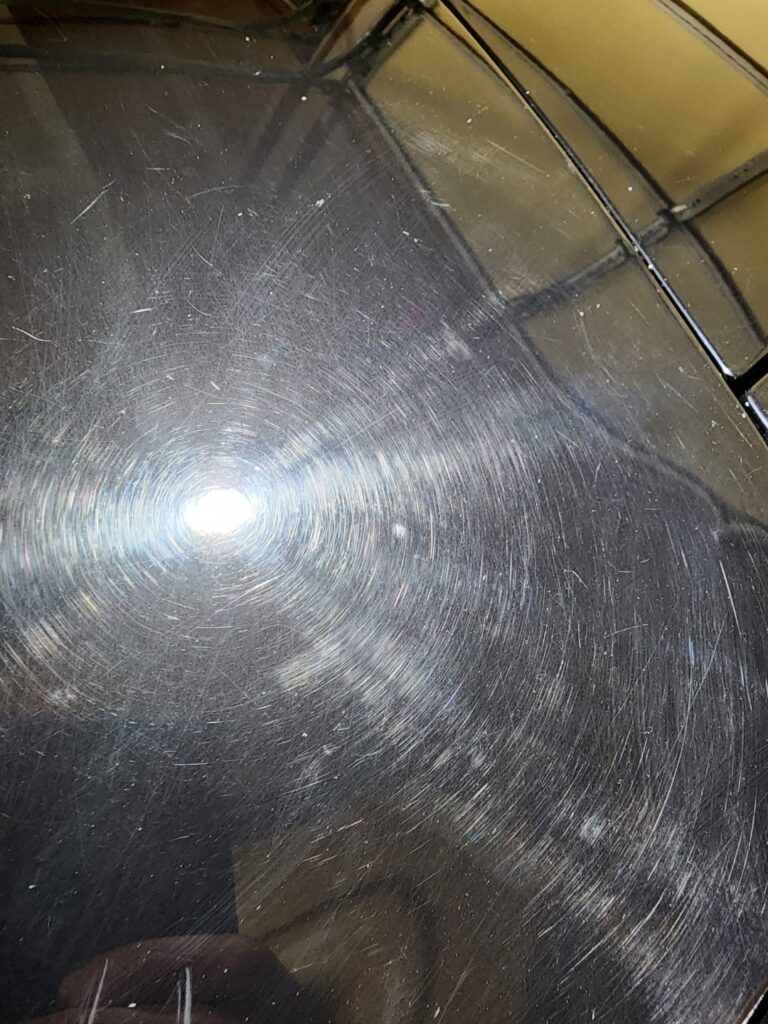
- Swirl Marks: Often introduced by subpar wash mitts or towels, swirl marks are the bane of any car owner’s existence. They can also result from harsh automated car washes.
- Scratches: Whether it’s from tree branches, flying road debris, or a careless passerby with a metal zipper, scratches come in all shapes and depths.
- Oxidation: Over time, UV rays break down the paint, causing it to lose its vibrant color and appear chalky or faded. Oxidation speeds up if your vehicle spends most of its time in direct sunlight.
- Water Spots: Minerals in tap water or acid rain can etch into the clear coat, leaving behind unsightly water spots.
- Road Grime & Chemicals: Road salt, brake dust, and various chemicals can gradually eat into the clear coat if not washed off promptly.
These defects, though often microscopic, scatter light rays when they strike the paint surface, making your car look dull. Paint correction works by leveling out these minute hills and valleys, so light reflects more uniformly. It’s much like sanding a piece of wood until it’s smooth. Each pass of a polisher removes a microscopic layer of clear coat, eliminating the peaks and filling the valleys, giving your paint job that mirror-like finish.
If you’re seeing dullness, hazing, or faint scratch lines—those are prime indicators that paint correction could make a substantial difference. Coupled with proper maintenance afterward, you can keep your vehicle looking glossy and new for a prolonged period.
Levels of Paint Correction
Paint correction can be divided into several stages or levels, each suited to different degrees of paint damage. Choosing the right level depends on how severe the imperfections are and how flawless you want the end result to be.
- One-Step or “AIO” (All-In-One)
- Purpose: Removes light swirl marks and oxidation.
- Result: Offers moderate improvement, often used for relatively new or well-maintained vehicles.
- Time & Cost: Typically less expensive and quicker than multi-stage corrections.
- Two-Step Correction
- Purpose: Addresses moderate swirl marks, oxidation, and minor scratches.
- Result: Noticeable improvement in clarity and gloss, eliminating most defects visible under normal lighting conditions.
- Process: Involves an initial cutting compound followed by a finishing polish.
- Three-Step (or More) Correction
- Purpose: Ideal for heavily neglected or older vehicles with severe swirl marks, deep scratches, and oxidation.
- Result: Showroom-like finish, with nearly all imperfections removed if the paint thickness allows.
- Process: Multiple passes with progressively finer abrasives, finishing off with a high-gloss polish.
- Wet Sanding (Extreme Correction)
- Purpose: Reserved for ultra-deep scratches or orange peel removal.
- Result: Dramatic transformation but carries higher risk because it removes more material from the clear coat.
- Process: Carefully sanding the clear coat before polishing it back to clarity.
When considering, Is paint correction worth it?, recognize that multi-stage correction will be more expensive and time-consuming. However, the results can be breathtaking. Choosing the right level often comes down to your budget, the condition of your vehicle, and your personal standards for paint perfection.
Essential Tools & Products
Investing in paint correction requires the right set of tools and products. While a professional detailer has a garage full of specialized equipment, you can still achieve significant improvements with a curated set of essentials at home.
- Dual-Action Polisher: Safer for beginners than a rotary polisher, as it reduces the chance of burning the paint.
- Polishing Pads: Foam, microfiber, or wool pads come in different levels of aggressiveness. Foam pads are popular for fine finishing.
- Polishing Compounds: Cutting compounds, medium polishes, and finishing polishes each serve a unique role in leveling out imperfections.
- Paint Thickness Gauge: A handy tool to measure how much clear coat you have. Helps you avoid over-thinning.
- Microfiber Towels: High-quality towels reduce the risk of introducing new swirl marks when wiping off polish residue.
- Masking Tape: Protects edges, trim, and rubber seals from accidental contact with the polisher.
- Lighting: Proper lighting, such as LED swirl-finding lights, helps you accurately assess the paint’s condition before and after each polishing pass.
Tip: When starting out, it’s often wise to practice on a spare panel or an inconspicuous area of your car. This helps you get the feel of the machine and dial in your technique before tackling the entire vehicle. For a deeper dive into the nuances of detailing products, you can check out Autogeek’s Detailing 101, which offers a wealth of tutorials and product recommendations.
Preparing Your Car for Correction
Preparation is crucial for successful paint correction. You don’t want to start polishing over dirt or contaminants, as this can introduce even more scratches.
Here’s a step-by-step rundown:
- Thorough Wash
- Use a pH-balanced car shampoo and a high-quality wash mitt.
- Rinse frequently to avoid dragging dirt across the paint.
- Decontamination
- Chemical Decon: Iron removers or tar removers dissolve embedded particles.
- Clay Bar: A clay bar or clay mitt picks up remaining contaminants, leaving the surface smooth.
- Inspection
- Check for major defects like deep scratches or rock chips that might require touch-up paint.
- Evaluate swirl marks under proper lighting to gauge the extent of correction needed.
- Taping & Masking
- Cover sensitive areas: emblems, plastic trim, and rubber seals.
- Taping prevents polish splatter and damage to non-painted surfaces.
- Test Spot
- Select a small, inconspicuous area to dial in the right combination of pad and polish.
- This ensures you don’t waste time using the wrong product combination over the entire car.
A clean, well-prepared surface sets the stage for a smooth polishing experience. Skipping any step might lead to less-than-optimal results or, worse, new scratches introduced by leftover debris. Spending extra time on prep work can drastically shorten the correction process and help you achieve that pristine “before & after” difference everyone raves about.
Achieving Real Before & After Transformations
Nothing illustrates the impact of paint correction better than before & after photos. The difference can be astonishing, often going from a dull, lifeless exterior to a reflective, high-gloss mirror finish. Here’s how you can maximize those dramatic transformations:
- Document the Starting Point
Take clear, well-lit photos or videos of your paint’s current condition. Include close-ups of swirl marks, scratches, and hazing. - Work in Sections
Divide your car into panels or smaller sections. This ensures you give each area the attention it deserves without rushing. - Use the Right Pressure
Let the polisher’s weight do most of the work. Pressing too hard can lead to uneven results and risks overheating the paint. - Check Your Progress
After a few passes, wipe off the polish with a clean microfiber towel and inspect the area under direct light or swirl-finder lights. Continue until you achieve the level of clarity you want. - Keep It Cool
Overheating the paint or pads can degrade the polish’s effectiveness and risk damaging the clear coat.
When you compare the final result to the initial photos, the stark contrast is often enough to convince skeptics. Paint that once looked faded or covered in spider webbing can suddenly boast a showroom shine. These transformations validate why so many people see paint correction as a worthy endeavor—especially if you plan to keep the vehicle for several more years or display it at car shows.
The Time & Cost Factor
Paint correction is an investment in both money and time. Professional services can range from a couple of hundred dollars for a basic one-step polish to over a thousand for a multi-stage correction on a large or severely damaged vehicle.
- DIY Costs: Initial outlay for a dual-action polisher, pads, polishes, and accessories might run anywhere from $200 to $500 or more, depending on the quality of products.
- Professional Services: Expect to pay $300–$600 for a one-step correction on a mid-sized sedan. Multi-stage corrections can climb to $1,000 or beyond for high-end vehicles or heavily neglected paint.
In terms of time:
- DIY Time Commitment: A single-stage correction might take 4–6 hours. Multi-stage corrections could consume an entire weekend or more, especially for beginners.
- Professional Turnaround: Depending on the detailer’s schedule and complexity, your car might be out of commission for a day or two.
While paint correction may not be the cheapest car-care procedure, the value it adds can be substantial—particularly if you’re considering selling or trading in your vehicle. A clean, glossy exterior can increase perceived value and make your ride stand out from the crowd. Plus, the boost in pride and enjoyment you get from seeing your car looking its best is often priceless.
Environmental Considerations
Sustainability might not be the first thing that comes to mind with paint correction, but it does matter. Polishing compounds, pads, and even the runoff from washing can impact the environment. Here’s how to reduce your ecological footprint:
- Biodegradable Products: Opt for soaps and polishes labeled as biodegradable or eco-friendly.
- Water Conservation: Use a pressure washer or foam cannon for a pre-rinse. These methods can reduce overall water usage by quickly removing surface grime.
- Safe Disposal: Don’t wash chemical-laden water down storm drains. Whenever possible, wash your car in areas where water drains to a sewer system that treats runoff.
- Pad Maintenance: Reusable pads can be washed and used multiple times. Proper care extends their life, reducing waste.
When managed responsibly, paint correction isn’t necessarily worse for the environment than routine car washing. Modern detailing products are increasingly formulated to be both effective and eco-conscious, giving you the best of both worlds—spectacular car paint and a cleaner planet.
Tips to Prolong a Corrected Finish
After spending hours or shelling out cash on paint correction, you’ll want to maintain that fresh, glossy look for as long as possible. Here are some straightforward tips:
- Frequent Washing
- Use the “two-bucket method” to minimize swirl marks.
- Wash once a week or every two weeks, depending on your driving conditions.
- Safe Drying
- Dry with a clean, plush microfiber towel or a dedicated car dryer.
- Avoid letting water evaporate on the surface, which can leave mineral deposits.
- Paint Sealant or Ceramic Coating
- Apply a sealant or ceramic coating to add a protective layer that repels contaminants.
- These coatings also enhance gloss and reduce maintenance effort.
- Avoid Automated Car Washes
- Brushes or abrasive strips can introduce new micro-scratches and swirl marks.
- Park Smart
- Whenever possible, park under shade or use a car cover to shield your paint from harsh UV rays and acid rain.
- Professional Inspection
- If you’re serious about show-car quality, schedule periodic check-ups with a professional detailer to touch up minor imperfections before they become more severe.
With the right products and careful technique, you can preserve that crisp clarity and gloss for months—sometimes even years, especially if you opt for high-quality sealants or ceramic coatings. Think of it this way: paint correction sets a new baseline. Your job then is to prevent slipping back into swirl-mark territory.
Common Myths & Misconceptions
The world of detailing is rife with myths, particularly around paint correction. Let’s clear the air and make sure you’re armed with accurate information:
- Myth: Paint Correction Is Just a Fancy Waxing
- Fact: Waxing only adds a protective layer; paint correction actually removes imperfections in the clear coat.
- Myth: Only New Cars Can Benefit
- Fact: Even older cars with heavy oxidation can see dramatic improvements with the right level of correction.
- Myth: It Will Destroy My Clear Coat
- Fact: When performed properly, only a microscopic layer of clear coat is removed. A paint thickness gauge and correct technique minimize risk.
- Myth: It’s a One-Time Fix
- Fact: While paint correction can dramatically improve your car’s finish, maintaining that shine requires proper washing and protection routines.
- Myth: DIY Paint Correction Isn’t Effective
- Fact: With proper tools, products, and patience, a dedicated enthusiast can achieve near-professional results.
By debunking these misconceptions, you’ll have a clearer sense of what paint correction involves and why it’s not just another buzzword in the detailing world.
FAQs
Below are some of the most frequent questions car owners ask about paint correction. These address common concerns and provide additional insight if you’re still wondering, Is paint correction worth it?
- Q: How often should I get paint correction done?
A: Most vehicles don’t need paint correction more than once a year—if that. The better you maintain your car’s finish (using proper washing techniques, sealants, etc.), the less frequently you’ll need correction. - Q: Can I polish my car by hand to get the same results?
A: Hand polishing can improve the finish slightly but won’t match the efficiency or depth of correction achieved with a machine polisher. Machine polishing is far more consistent and thorough. - Q: Will paint correction fix rock chips?
A: Paint correction removes surface defects. Rock chips, which go deeper than the clear coat, usually require touch-up paint or more specialized repairs before or after correction. - Q: Is paint correction safe for all car paints?
A: Generally, yes. But some older vehicles with single-stage paint or very thin clear coats require more caution. Using a paint thickness gauge can help ensure safety. - Q: Can I wax my car immediately after paint correction?
A: Absolutely. In fact, applying a wax, sealant, or ceramic coating is often the final step to lock in that polished shine and protect the clear coat. - Q: What’s the difference between paint correction and paint protection film (PPF)?
A: Paint correction removes existing imperfections, while PPF is a physical layer placed over your paint to prevent new damage. Many enthusiasts correct the paint first, then apply PPF for long-term protection.
Professional vs. DIY Paint Correction
Deciding whether to tackle paint correction yourself or leave it to the pros often boils down to budget, confidence, and desired results. Below is a quick comparison:
| Factor | DIY Route | Professional Service |
|---|---|---|
| Cost | Initial investment in tools & products | Higher upfront cost, but expertise included |
| Time | Several hours to several days for multi-stage | Faster turnaround with a trained team |
| Equipment | Polisher, pads, compounds, plus learning curve | High-end polishers, specialized lighting, paint gauges |
| Results | Potentially good with practice | Typically more consistent, especially for severe defects |
| Risk | Possible learning mistakes, risk of paint damage | Minimal if you choose a reputable detailer |
DIY can be rewarding if you enjoy the process and have the patience to learn proper techniques. Professionals, on the other hand, bring years of experience and an arsenal of specialized tools that can tackle even the most challenging paint issues efficiently.
The Future of Paint Correction Technology
Automotive finishes and detailing technology continue to evolve. Emerging trends hint at even more efficient and safer paint correction methods:
- Advanced Ceramic Polishes: These polishes contain microscopic ceramic particles that can remove defects while laying down a protective barrier.
- Self-Healing Clear Coats: Some high-end manufacturers are experimenting with clear coats that can “heal” minor scratches with heat or light exposure.
- AI-Driven Polishing Machines: While still in early development, automated polishing units with AI sensors could become common in large detailing shops, ensuring uniform results and minimizing human error.
- Eco-Friendly Formulations: Expect more water-based and biodegradable polishing compounds that offer top-tier results without harming the environment.
As vehicles become more sophisticated, so do the paint systems that protect them. Paint correction will keep adapting, offering improved tools and methods that deliver stellar results with minimal risk.
Conclusion
When weighing the question, Is paint correction worth it?, the answer largely depends on your goals. If you cherish your vehicle’s appearance, want to preserve or boost its value, or simply take pride in driving a glossy, like-new car, then paint correction offers substantial benefits. The transformation can be downright astonishing—turning a swirl-laden, dull finish into a pristine, mirror-like surface.
Keep in mind, though, that paint correction isn’t a magic bullet. It removes a thin layer of clear coat and demands both time and skill. Whether you choose the DIY path or go pro, the key is using proper techniques, tools, and maintenance practices. If you do, your car’s paint will thank you with lasting shine and a head-turning finish. With new technologies on the horizon and a growing push toward eco-friendly detailing, paint correction is poised to become even more effective and accessible for enthusiasts everywhere.